Introduction
Going solar in California is not as simple as hiring a contractor and flipping a switch. While the physical installation typically takes just 1–3 days, the complete journey from initial quote to powering on your system spans 2–4 months in Southern California. Most of this time is consumed by permitting and utility approval processes, not construction.
California homeowners must clear several regulatory hurdles before a system can go live:
- Licensed contractor requirements (CSLB certification)
- City or county building permits
- Utility interconnection approval (Permission to Operate)
- HOA sign-off (required in many Los Angeles County neighborhoods)
Each step is mandatory. Skipping or rushing any phase typically results in failed inspections, utility rejection, or costly rework.
This guide walks through every phase of the California solar installation process—from your first free quote through the moment your system goes live—so you know exactly what to expect, how to avoid common delays, and what questions to ask your contractor.
TL;DR
- The full timeline from quote to Permission to Operate (PTO) takes 2–4 months in California, with most wait time tied to permits and utility approval
- A licensed contractor handles site assessment, system design, permit applications, and utility interconnection paperwork on your behalf
- California requires both a building permit and utility interconnection approval before your system can legally export power
- Physical installation takes just 1–3 days for a typical Los Angeles residential system
- Under NEM 3.0, adding battery storage significantly improves long-term savings; decide during the design phase, before permits are filed
What to Know Before Getting Your First Solar Quote in California
Before you call a contractor, assess three critical factors that will determine your project's feasibility and timeline.
Roof Condition and Orientation
Your roof must be structurally sound and have sufficient remaining lifespan to support a solar system for 25+ years. Ideal conditions for Southern California include:
- South-facing orientation (including southeast and southwest angles)
- Roof tilt between 15–40 degrees for optimal year-round production
- Minimal shading from trees, chimneys, or neighboring structures
- Roof material in good condition (asphalt shingle, tile, or metal)
If your roof needs replacement within the next 5–7 years, address that before installing solar to avoid the significant cost of removing and reinstalling panels later.
Electrical Panel Capacity
Older Los Angeles homes frequently require electrical panel upgrades to accommodate solar systems, especially when adding battery storage. During the site assessment, contractors evaluate whether your main panel has sufficient capacity or needs upgrading from a typical 100-amp to a 200-amp service. Identifying this requirement early prevents mid-project delays and cost surprises.
HOA Approval in Southern California Neighborhoods
If you live in an HOA community—common in Beverly Hills, Calabasas, Pasadena, Manhattan Beach, and similar areas—you're protected by **California Civil Code Section 714**, which prevents HOAs from blocking solar installations outright.
However, HOAs may impose "reasonable restrictions" that don't increase system cost by more than $1,000 or decrease efficiency by more than 10%. They may also restrict panel placement or require specific aesthetic considerations.
Critical timing note: HOAs must approve or deny applications within 45 days of receipt. Start your HOA review process simultaneously with (or before) signing a contract to avoid adding 30–60 days to your project timeline.
Choosing the Right California Solar Contractor
Before signing anything, verify these contractor qualifications:
- Holds a C-46 Solar Contractor license, C-10 Electrical license, or B General Building Contractor license — verify at cslb.ca.gov
- Carries NABCEP certification, a voluntary credential that signals advanced expertise and adherence to national safety standards
- Has established relationships with your city's Authority Having Jurisdiction (AHJ) to move permits through faster
- Manages permitting, utility coordination, and post-installation support — not just the physical install
California Home Solar has handled every phase of this process for Southern California homeowners for 36 years — from the initial site assessment through utility activation. As a recognized Top 500 Solar Contractor, the company assigns dedicated project management to each job, keeping permitting, inspections, and utility coordination on track.
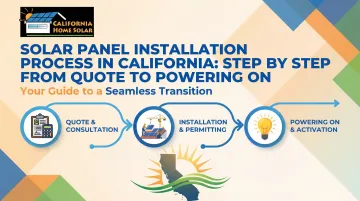
The California Solar Installation Process: Step by Step
The process follows a defined sequence. Skipping any phase — especially design review or permit submission — typically causes rework, failed inspections, or utility rejection.
Step 1 – Free Quote and Site Assessment (Week 1–2)
During the initial site assessment, your contractor evaluates:
- Roof condition and dimensions — structural integrity, material type, and available solar zone area
- Shading patterns from trees, chimneys, and neighboring structures that reduce production
- Current energy usage — 12 months of utility bills to determine appropriate system size
- Electrical panel capacity — whether your main panel needs upgrading (common in older LA homes)
The result is a system size recommendation and formal proposal.
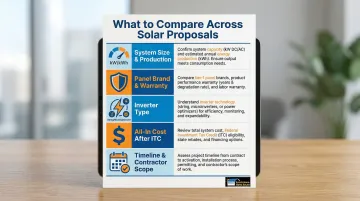
What to compare across 2–3 proposals:
- System size (kW) and expected annual production (kWh)
- Panel brand, efficiency rating, and warranty terms
- Inverter type (string inverter, microinverters, or power optimizers)
- All-in cost after the federal 30% Investment Tax Credit
- Installation timeline and what the contractor handles vs. what you must coordinate
Current California pricing: As of early 2026, residential solar costs average $2.38–$3.14 per watt before incentives. For a typical 8 kW system, expect $19,040–$25,120 before the federal tax credit, or $13,328–$17,584 after the 30% credit.
Step 2 – System Design and Engineering (Weeks 2–5)
Once you sign a contract, the engineering team creates a custom CAD system design that determines exact panel layout, racking, wiring, and inverter placement. This design must comply with California Title 24 building energy standards and your local AHJ's electrical code requirements.
Critical decision point: Battery storage under NEM 3.0
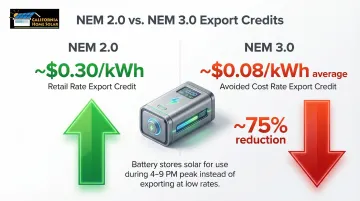
This is when you must decide whether to add battery storage (such as the Enphase IQ Battery or Tesla Powerwall). Under California's NEM 3.0 (Solar Billing Plan), which took effect April 15, 2023, the value of excess solar energy sent to the grid was reduced by approximately 75% compared to the previous NEM 2.0 rates.
Why this matters:
- NEM 2.0 credited exports at retail rates (~$0.30/kWh)
- NEM 3.0 credits exports at avoided cost rates (~$0.08/kWh average)
- Battery storage allows you to store solar energy and use it during expensive evening peak hours (4–9 PM) rather than exporting it at low rates
Adding battery storage typically increases upfront costs by $15,000–$16,000 before incentives, but significantly improves long-term savings by maximizing self-consumption during high-value Time-of-Use (TOU) periods.
Step 3 – Permit Submission (Weeks 3–8)
With your design finalized, your contractor submits for two required permits before any work can begin on your roof:
- Solar PV Permit – for panels and mounting hardware
- Electrical Permit – for wiring, inverter, and interconnection work
These are submitted to your local city or county Building and Safety Department. In LA County, different cities (Los Angeles, Burbank, Pasadena, Glendale, etc.) have their own AHJs with different timelines and requirements.
SolarAPP+ can dramatically reduce wait times
Some California jurisdictions have adopted SolarAPP+, a state-backed automated permit platform. According to NREL data, projects processed through SolarAPP+ are permitted and inspected approximately 12–13 business days faster than those going through traditional manual review.
LA-area cities using SolarAPP+ include:
- Alhambra, Arcadia, Carson, Chino, Chino Hills, Claremont, Covina, Cudahy, Cypress, and others
Cities still using manual review typically take 4–8 weeks for permit approval. A contractor familiar with your specific city's requirements can prevent revision cycles that restart the clock entirely.
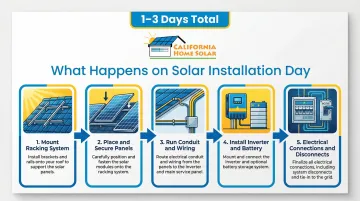
Step 4 – Physical Installation Day(s) (1–3 Days)
Permits approved, the installation crew arrives on-site. For most Southern California homes, the physical work spans 1–3 days and includes:
- Mount the racking system to your roof
- Place and secure solar panels
- Run conduit and wiring from the roof to the electrical panel
- Install the inverter (and battery storage system, if applicable)
- Complete electrical connections and safety disconnects
You don't need to be home for most of the day, but plan to be available for electrical panel work and the final walkthrough.
Preparation checklist:
- Ensure clear roof and attic access
- Remove vehicles from driveway and work areas
- Secure pets indoors
- Notify neighbors of scheduled work
Navigating California Permits, Utility Approval, and Permission to Operate
After physical installation, the project shifts to regulatory approval—the phase where California's process differs most from other states, particularly in utility interconnection timelines. Two sequential approvals are required, and neither can be skipped.
City Inspection Sign-Off (1–2 Weeks)
A local building inspector visits your property to verify:
- Installation matches approved permit plans
- Work meets electrical codes and fire safety requirements
- Proper fire code setbacks are maintained (California requires 3-foot pathways on rooftops for firefighter access)
- Structural mounting is secure and code-compliant
If anything fails inspection, your installer must correct it before re-inspection, which restarts the wait. This typically takes 1–2 weeks after installation in the LA area.
Utility Interconnection and Permission to Operate (1–4 Weeks)
Once the city signs off (the "job card" is closed), your contractor submits the interconnection application to your local utility:
- Southern California Edison (SCE) for most of Los Angeles County
- LADWP for City of Los Angeles proper
The utility reviews the application and may require a meter upgrade or grid impact study before granting Permission to Operate (PTO). This step typically takes 1–4 weeks, with summer months often running toward the longer end due to higher application volume.
Critical rule: You cannot turn on your solar system until you receive official PTO. Operating before approval violates your utility agreement and may result in loss of net metering eligibility.
Understanding NEM 3.0 Billing at Activation
When you receive PTO, you're automatically enrolled in California's Solar Billing Plan (NEM 3.0). Under this framework, export credit values are set by the Avoided Cost Calculator (ACC)—a shift from NEM 2.0, which credited exports at full retail rates.
Key NEM 3.0 characteristics:
- Export credits vary by hour, day, and month based on grid demand at the time of export
- Evening peak hours (4–9 PM) carry the highest electricity rates but the lowest export credit values
- Residential customers enrolling before 2028 receive a 9-year lock-in of their export credit values
These dynamics make battery storage particularly valuable under NEM 3.0. If you have a battery installed, program it to discharge during the 4–9 PM window—when you're buying the most expensive grid power and exporting earns the least. At activation, ask your installer to configure your monitoring app and confirm your TOU rate plan is optimized for your usage pattern.
Common Delays in the California Solar Installation Process
Most delays in California solar projects come down to three predictable bottlenecks. Knowing them upfront helps you set realistic expectations — and ask the right questions before signing with a contractor.
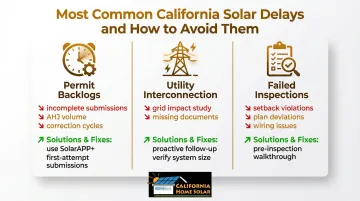
Permit Processing Backlogs
Permit approval can stall installation by weeks when the AHJ (Authority Having Jurisdiction) is backlogged or receives an incomplete submission. Common triggers include:
- High application volume at the local building department
- Incomplete or incorrect plan set submissions
- Engineering documents flagged for corrections
Work with a contractor who knows your specific city's AHJ requirements. Ask upfront whether they've used SolarAPP+ in your jurisdiction and whether they submit complete, code-compliant plan sets on the first attempt — revision cycles are one of the most avoidable delays.
Utility Interconnection Slowdowns
Even after passing city inspection, PTO (Permission to Operate) can lag weeks behind schedule. In Southern California, high interconnection request volume is a persistent issue. Other common causes include:
- System flagged for a grid impact study due to size or transformer capacity
- Missing or incorrect interconnection application documents
Make sure your contractor files the application correctly and follows up proactively with the utility. Ask upfront whether your system size or location is likely to trigger additional review. Systems under 30 kW rarely require supplemental studies — larger ones may trigger a full grid impact review, adding months to the timeline.
Roof or Panel Issues Found During Inspection
A failed inspection requires partial rework before re-inspection, adding one to three weeks to the timeline. Inspectors typically flag:
- Installations that deviate from the permitted plan
- Fire code setback violations (3-foot pathways, panels positioned too close to the ridge)
- Wiring or conduit work that doesn't meet electrical code
Choose an installer who knows California's fire code setback rules cold. Ask whether they conduct a pre-inspection walkthrough before the official inspection date — that one step catches most compliance issues before they become delays.
Pro Tips for a Smoother Solar Installation in Los Angeles and Southern California
Four actions can meaningfully shorten your timeline and increase your financial return:
Submit HOA approval the day you sign your contract. In many LA neighborhoods, HOA review runs 30–60 days. Waiting until after permits are filed adds that delay directly to your go-live date.
Ask about HERO financing during the design phase. The HERO Program is a property-assessed financing option — meaning repayment is added to your property tax bill, not a monthly loan. It carries no money due at signing and no minimum credit score requirement. California Home Solar is a HERO-registered contractor.
Verify your federal tax credit eligibility before installation. The 30% Residential Clean Energy Tax Credit (ITC) covers the full installed cost of panels and battery storage (batteries must have at least 3 kWh capacity). It's valid through 2032 and can represent thousands of dollars back — confirm your eligibility with a tax advisor.
Program your battery for evening peak hours once the system is live. Pull your utility's TOU rate schedule (SCE and LADWP both peak from roughly 4–9 PM) and set your battery to discharge during that window. This is where NEM 3.0 savings are made. Your installer will walk you through the monitoring tools at activation.
Frequently Asked Questions
How much does solar installation cost for a 2000 sq ft home in California?
A typical 2,000 sq ft Southern California home usually requires a 6–8 kW system. Current installed costs average $2.38–$3.14 per watt, resulting in $14,280–$25,120 before incentives. After the federal 30% ITC, net costs range from $9,996–$17,584. Final pricing depends on roof complexity, panel brand, and whether battery storage is added.
What is the solar panel installation process in California?
The process includes six major phases: quote and site assessment, system design and engineering, permit application, physical installation, city inspection, and utility interconnection (PTO). Physical installation is the shortest phase — regulatory steps like permitting and utility approval make up most of the overall timeline.
How long does it take to get solar panels installed in California?
The end-to-end timeline from signed contract to Permission to Operate typically takes 2–4 months in California. Permitting and utility interconnection account for most of the wait; the physical installation itself usually takes only 1–3 days for a residential system.
Do you need a permit to install solar panels in California?
Yes, California requires both a Solar PV Permit and an Electrical Permit. Your contractor submits these to the local city or county AHJ. The system cannot legally be turned on until both the city inspection is passed and the utility grants Permission to Operate.
Can I install solar panels myself in California?
California technically allows DIY solar, but permitting, electrical code compliance, and utility interconnection requirements make it impractical for most homeowners. Utilities require a licensed CSLB contractor's sign-off for interconnection approval, which effectively rules out DIY for residential systems.
What is NEM 3.0 and how does it affect my solar installation in California?
NEM 3.0 (the Solar Billing Plan) replaced NEM 2.0 on April 15, 2023, and reduced export credits by approximately 75% compared to retail rates. This makes battery storage more valuable, as it allows homeowners to store solar energy and use it during expensive evening peak hours (4–9 PM) rather than exporting it at low rates.